I’ve wanted a homelab cluster that’s easy to manage and expand, a setup that feels like a production environment but doesn’t break the bank. Sure, setting up a management cluster might take a bit more effort at the start, but I’m convinced that this upfront work will pay off with easier upgrades and smoother cluster management down the road. Let’s examine how we can build a cost-effective, production-like management cluster for a homelab using Rancher and k3s.
Requirements
kind
Once KIND is installed, setting up a cluster is straightforward. Although KIND supports multi-node configurations, we’ll keep things simple with a single-node cluster since we’re only running Traefik, cert-manager, and Rancher. This cluster will be used solely for managing our k3s cluster and will only be active when needed.
Create a kind-config.yaml file with the following contents:
Initial cluster creation
Simply create a kind-config.yaml with the below contents:
1kind: Cluster
2apiVersion: kind.x-k8s.io/v1alpha4
3nodes:
4- role: control-plane
5  image: kindest/node:v1.28.15
and run:
1kind create cluster --name rancher-cluster --config kind-config.yaml`Once the process finishes, if you run docker ps you should see something like:
1CONTAINER ID   IMAGE                   COMMAND                  CREATED          STATUS          PORTS                       NAMES
2f045d3b51f0e   kindest/node:v1.28.15   "/usr/local/bin/entr…"   17 seconds ago   Up 14 seconds   127.0.0.1:42351->6443/tcp   rancher-cluster-control-plane
KIND will have already populated your local kubeconfig, allowing you to run kubectl commands immediately.
cert-manager
One of the main requirements for running Rancher on Kubernetes is TLS. By default, Rancher generates a self-signed certificate and manages it for you. However, to gain a bit more control, we will generate our own self-signed certificate authority (CA) to use for both Traefik and Rancher. This approach also provides flexibility if you decide to expand this management cluster in the future and require more certs.
Deploying cert-manager
First, add the cert-manager repository in Helm:
1helm repo add jetstack https://charts.jetstack.io
2helm repo update
Next, create a values file for the Helm chart. Save the following as cert-manager-values.yaml:
1---
2replicaCount: 1
3extraArgs:
4  - --v=2
5crds:
6  enabled: true
7  keep: true
Most of this is fairly straight forward, we are enabling the cert-manager custom resource definitions and allowing them to remain post uninstall. We add the --v=2 for more log verbosity but it’s entirely optional.
Install the cert-manager Helm chart using your values file:
1helm install cert-manager jetstack/cert-manager \
2    --namespace "cert-manager" \
3    --create-namespace \
4    --version "v1.17.1" \
5    -f "cert-manager-values.yaml"
Configuring your private CA
Once the cert-manager pods are up and running, add your self-signed CA. First apply this manifest. This creates a simple self-signed issuer for generating certificates:
1---
2apiVersion: cert-manager.io/v1
3kind: ClusterIssuer
4metadata:
5  name: selfsigned-issuer
6spec:
7  selfSigned: {}
Next, create a self-signed CA certificate:
 1---
 2apiVersion: cert-manager.io/v1
 3kind: Certificate
 4metadata:
 5  name: ca-certificate
 6  namespace: cert-manager
 7spec:
 8  secretName: ca-key-pair
 9  isCA: true
10  commonName: "homelab-ca"
11  duration: 8760h #1 year validation
12  renewBefore: 360h #15 day renewal
13  issuerRef:
14    name: selfsigned-issuer
15    kind: ClusterIssuer
Finally, set up a ClusterIssuer that leverages the pre-existing CA stored in the ca-key-pair secret:
1---
2apiVersion: cert-manager.io/v1
3kind: ClusterIssuer
4metadata:
5  name: homelab-ca
6spec:
7  ca:
8    secretName: ca-key-pair
Note: This kind cluster will not have secrets encrypted at rest. This CA should only be used for the inital boot strap of your clusters with Rancher. You can look into kubeadmConfigPatches to possibly apply an EncryptionConfiguration to the API server in the kind cluster but for this demonstration, I’m not going to deep into it.
Trust your new CA
Once you have this set up we can fetch the root CA and add it to our target homelab machines trust store.
1kubectl -n cert-manager get secret ca-key-pair -o jsonpath='{.data.ca\.crt}' | base64 --decode > "$CERT_FILE"The trust store update depends on your target OS. For Ubuntu, simply transfer the file via scp, move it to /usr/local/share/ca-certificates/, and run:
1sudo update-ca-certificatesTraefik
Before deploying Rancher, we need an ingress controller on our management cluster. Rancher uses an ingress to manage and route external traffic (e.g., the Rancher UI and API endpoints). For this, we will use Traefik. Although Traefik comes bundled with k3s, it is an excellent ingress solution on its own.
Creating the Traefik certificate
Create the Traefik namespace:
1kubectl create namespace traefikNext, create a certificate manifest for Traefik. Save the following as traefik-certificate.yaml, substituting your domain as needed:
 1---
 2apiVersion: cert-manager.io/v1
 3kind: Certificate
 4metadata:
 5  name: traefik-cert-somedomain-lan
 6  namespace: traefik
 7spec:
 8  secretName: traefik-default-cert
 9  duration: 2160h #90 day validation
10  renewBefore: 360h #15 day renewal
11  dnsNames:
12    - "*.somedomain.lan"
13    - "somedomain.lan"
14  issuerRef:
15    name: homelab-ca
16    kind: ClusterIssuer
17    group: cert-manager.io
Note: This manifest creates a SAN certificate with a wildcard. In production, it’s better to be explicit with the SAN.
Apply the certificate:
1kubectl apply -f traefik-certificate.yamlDeploying Traefik
First, add the Traefik Helm repository:
1helm repo add traefik https://helm.traefik.io/traefik
2helm repo update
Then create a traefik-values.yaml file with the following content:
 1ingressRoute:
 2  dashboard:
 3    enabled: true
 4
 5ports:
 6  web:
 7    redirections:
 8      entryPoint:
 9        to: websecure
10        scheme: https
11        permanent: true
12
13ingressClass:
14  name: traefik
15
16providers:
17  kubernetesCRD:
18    ingressClass: traefik
19  kubernetesIngress:
20    ingressClass: traefik
21
22tlsStore:
23  default:
24    defaultCertificate:
25      secretName: traefik-default-cert
26
27service:
28  type: NodePort
Let’s break down what this configuration does:
-
The ingressRoute.dashboard setting enables the dashboard, which isn’t directly accessible since we don’t expose the Traefik API port. You can use port-forwarding to access it for troubleshooting.
-
Under ports, HTTP traffic is redirected to the HTTPS port (websecure), ensuring that all traffic is encrypted.
-
The providers.kubernetesCRD.ingressClass and providers.kubernetesIngress.ingressClass settings instruct Traefik to watch for custom resources and standard Ingress resources labeled with the “traefik” ingress class.
-
The tlsStore value configures Traefik’s default TLS certificate from the Kubernetes secret traefik-default-cert.
-
Finally, the service is set to NodePort to make it easier to expose Traefik on your LAN. You might consider using cloud-provider-kind if you wish to simulate a cloud provider’s load balancer with an Envoy proxy container. However, specifying the port manually with port-forwarding is often more straightforward.
With your Traefik configuration and certificate in place, install the ingress with:
1  helm install traefik traefik/traefik \
2    --namespace "traefik" \
3    --version "34.4.1" \
4    -f "traefik-values.yaml"
Rancher
With your KIND cluster, cert-manager, and Traefik already in place, you can now deploy Rancher to fully manage your homelab Kubernetes clusters.
Configuring Rancher TLS
Similar to before we need a certificate and a namespace. Create the namespace:
1kubectl create namespace cattle-systemIssue another certificate for Rancher by applying the following manifest, again change the domain accordingly:
 1---
 2apiVersion: cert-manager.io/v1
 3kind: Certificate
 4metadata:
 5  name: rancher-cert-somedomain-local
 6  namespace: cattle-system
 7spec:
 8  secretName: rancher-default-cert
 9    duration: 2160h #90 day validation
10    renewBefore: 360h #15 day renewal
11  dnsNames:
12    - rancher.somedomain.lan
13  issuerRef:
14    name: homelab-ca
15    kind: ClusterIssuer
16    group: cert-manager.io
And again, apply:
1kubectl apply -f rancher-certificate.yamlFor Rancher to trust a private certificate we need to generate a tls-ca secret containing the ca.crt value of our issued Rancher certificate.
We could just call the secret generated by the above certificate tls-ca but I’d like to keep the name scheme of the certificates issued by cert-manager
the same within the cluster. So let’s generate a new secret from our rancher-certificate to satisy Ranchers naming requirements.
1kubectl get secret rancher-default-cert -n "${RANCHER_NAMESPACE}" -o jsonpath="{.data.ca\.crt}" | base64 --decode > cacerts.pem
2kubectl -n "${RANCHER_NAMESPACE}" create secret generic tls-ca --from-file=cacerts.pem
3rm cacerts.pem
Installing Rancher
We can continue to use helm to deploy to our cluster. Let’s add the rancher-stable repository:
1helm repo add rancher-stable https://releases.rancher.com/server-charts/stable
2helm repo update
And create a values file we can use to deploy our helm chart:
 1hostname: rancher.somedomain.lan
 2
 3bootstrapPassword: "admin"
 4
 5ingress:
 6  tls:
 7    source: secret
 8    secretName: rancher-default-cert
 9
10privateCA: true
Let’s take a look at what we are configuring again:
-
hostnameis obviously the hostname for our rancher instance, again match this with your chosen domain. -
bootstrapPasswordis the inital install key for first time boot. You can change this to whatever you feel is secure. -
ingress.tls.sourceandingress.tls.secretindicate that the tls secret shuld be sourced from our secret and points it to our rancher certificate. -
privateCAinstrucrs Rancher to use a privateCA for it’s communication. This will load in the tls-ca certificate we generated earlier.
And for our final install:
1  helm install rancher-stable/rancher \
2    --namespace "cattle-system" \
3    --version "v2.10.3" \
4    -f "rancher-values.yaml"
Port forwarding Traefik
Your LAN will need to be able to reach this service behind Traefik for worker nodes to reach the Rancher endpoint. I could write an entire new blog about setting up a private DNS server but a quick fix for a small number of machines is to just port-forward the service and edit the hosts file accordingly:
Port-forward the service on the management cluster:
1kubectl port-forward --address 0.0.0.0 svc/traefik 8443:443Note: Binding with –address 0.0.0.0 is perfectly fine here since it’s operating on a private IP in your homelab environment.
Fetch your current private IP on your target worker node:
1ip addr show
2...
3eth1: <BROADCAST,MULTICAST,UP,LOWER_UP> mtu 1500 qdisc mq state UP group default qlen 1000
4  ...
5    inet 10.0.0.10/24 brd 10.0.0.255 scope global noprefixroute eth1
6   ...
Edit the hosts file:
1sudo vim /etc/hosts
2
3...
410.0.0.10    rancher.somedomain.lan
5...
Test accordingly incase you have any local firewall rules in play:
1nslookup rancher.cbtibs.lan
2Server: 127.0.0.53
3Address: 127.0.0.53#53
4
5Name: rancher.somedomain.lan
6Address: =10.0.0.10
7
8curl -s -o /dev/null -w "%{http_code}" https://rancher.somedomain.lan:8443
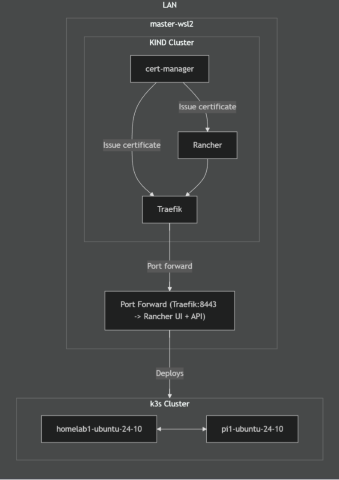
9200The cluster so far
In this deployment, we've set up three namespaces that each play a vital role in our management cluster. The traefik namespace deploys Traefik as our ingress controller, managing incoming traffic and allowing external access to Rancher on our k3s cluster. The cattle-system namespace houses Rancher's core components, serving as the backbone for cluster administration. Lastly, the cert-manager namespace contains the tools for issuing and renewing TLS certificates, ensuring secure communications across the system.
In part 2 of this series, we'll look into making use of Rancher to create a new cluster, updating it, and how we can utilise CAPI to automate some of Rancher via code.